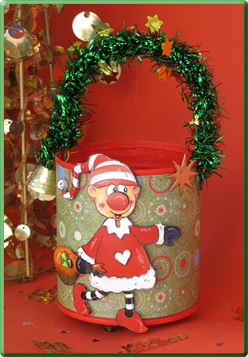
Tin for christmas treats
( Project of the month
October 2009
)
Materials:
- 3D sheet Santa's Helper
- tin
- acrylic paint
- 3d foam sheets
- scrapbooking paper
- double sided adhesive tape
- aluminium wire 1.5mm
- Christmas tinsel
- 3 beads
- hot glue gun
Instruction:
- Thoroughly wash and dry tin (we used a pineapple tin, 9cm high
and 8.5cm in diameter). If need be, sand sharp edges first.
- Paint inside and outside rims with a colour that compliments your
chosen scrapbooking paper, 2 coats if necessary. Let dry.
- In the meantime, cut out all parts of Santa's Helper and mount
the layers to form the 3D image using double sided adhesive
foam pads .
- Cut scrapbooking paper to size and adhere to tin with double
sided adhesive tape.
- With the hot glue gun stick 3 beads underneath the tin to act as
feet.
- Drill two holes on opposite sides at the top rim of the tin. Now
bend a handle from wire and thread it through the holes.
- Decorate it by wrapping the tinsel around the handle.
- Lastly, mount the Santa's Helper image on the tin, using the picture
as guide.
- The tin is now ready to be filled with Christmas treats.
 |
Email your questions to info@craftfactory.com.au
For our full range of
3D sheets click here!