welcome, baby!
( Project of the month June 2009
)
This month's project has been created by Caroline.
Caroline is a customer, friend and Stampin Up! demonstrator and has used
some products from their stamp and paper range.
For more information visit Caroline's
blogspot.

Materials Needed for Both Cards
Baby Girl Stamp
(91183)
Oval Cutting shapes (Creative Memories)Baby Boy Stamp
(91190)
Scallop Edge Punch (SU)
A5 White Cardstock for card base
Foam Mounting tape
Whisper White cardstock for Stamping (SU)
Baby Sentiment
Star Background Stamp (SU)
Clear Rhinestones
Baja Breeze Patterns Designer Papers & Ribbon Versamark
Pad
Pink Pirouette Patterns Designer Papers & Ribbon (SU) Heat and Stick
Powder (SU)
Dazzling Diamonds (SU) or Fine Glitter Baja Breeze
& Pink Pirouette Cardstock(SU)
(SU) -
Stampin Up!
Baby Girl Card
-
Fold A5 Cardstock in half for card base, cover with Pink Pirouette Striped Paper.
-
Stamp Star Background on a piece of 5cm x 10.5cm Whisper White, stick this at the bottom of the card over the striped paper. Hide the join with Pink Pirouette Ribbon and trim the edges.
-
Stamp Baby Girl Stamp on Whisper White Cardstock twice in black ink and once in Pink Pirouette Ink. Then on a piece of Patterned paper in Pink Pirouette Ink.
-
Cut out the baby from one of the black images, and the cloud from the other ~ when cutting out the cloud cut around the edges and then straight through the baby as you will need a guide to where to place the paper pieced baby later.
-
Cut out the PJ’s and the hair bow from the Pink Patterned Paper and stick on to the white baby image. Then cut the trim of the PJ’s from the white baby (stamped with pink) and stick this over the trim on the patterned paper.
-
Colour the baby’s face, hands and feet carefully with a Watercolour crayon, flesh coloured marker or watercolour pencils and blend with an aqua brush to get a soft tone. Then colour nose and hair. (I used Blush Blossom)
-
Take the cloud piece and press in to the Versamark Pad, then sprinkle with heat and stick powder, tap off the excess and then heat with your heat gun. This will make it tacky. Now sprinkle it with Dazzling Diamonds (or fine glitter), tap off excess and heat with heat gun again to set. (You can also use a Zig Glue Pen and sprinkle the glitter over and tap off excess ~ heat and stick just gives it a lovely even coverage)
-
Using glue, stick the baby to the cloud using the partial image of the baby to guide you. Then mount the baby image with foam tape on a White oval that has been matted with a pink oval.
-
Stamp the star background around the edge of a 7cm x 7cm piece of Whisper White Cardstock then stamp the sentiment toward to top, sponge the edges and mat on a 7.5cm x 7.5cm piece of Pink Pirouette paper from the paper pack.
-
Adhere the main image that is mounted on the ovals over the ribbon and sentiment piece.
-
Place a row of Clear Rhinestones along the top to finish of card.
-
You have finished!!
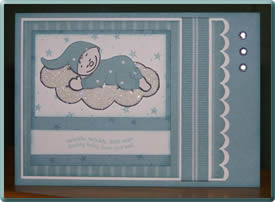
Baby Boy Card
-
Fold A5 Cardstock in half for card base. Cover this with a 15cm x 10.5cm piece of Baja Breeze Cardstock
-
Cut a piece of Baja Breeze Striped paper to 9.5cm x 15cm and scallop one edge with the Scallop Edge Punch. Then trim this to 9.5cm x 12.5cm
-
Cut a piece of white card stock to 11cm x 15cm and scallop one edge with the Scallop Edge Punch. Layer the Baja Breeze piece over this. Line up the scallops with a small amount of the white showing underneath, stick down then trim the other three edges to create a mat.
-
Take a piece of 9.5cm x 2cm white cardstock and stick to scalloped mat, toward the end with the scallops, wrap a length of Baja Breeze ribbon around this and adhere the whole piece to the main card front. Toward the left hand side.
-
Cut an 8.5cm x 8.5cm piece of Baja Breeze cardstock and a 5cm x 8cm piece of Whisper White and stamp with the star background stamp in Baja Breeze Ink and sponge edges. Adhere this toward the top of the Baja Breeze square.
-
Stamp the sentiment on a 1.5cm x 8cm piece of Whisper White in Baja Breeze, sponge the edges and adhere toward the bottom of the Baja Breeze Square.
-
Stamp Baby Boy Stamp on Whisper White Cardstock twice in black ink and once in Baja Breeze Ink. Then on a piece of Patterned paper in Baja Breeze Ink.
-
Cut out the baby from one of the black images, and the cloud from the other ~ when cutting out the cloud cut around the edges and then straight through the baby as you will need a guide to where to place the paper pieced baby later.
-
Cut out the PJ’s and the nightcap from the Baja Breeze Paper and stick on to the white baby image.
-
Colour the baby’s face, hands and feet carefully with a Watercolour crayon, flesh coloured marker or watercolour pencils and blend with an aqua brush to get a soft tone. Then colour nose and hair. (I used Blush Blossom)
-
Take the cloud piece and press in to the Versamark Pad, then sprinkle with heat and stick powder, tap off the excess and then heat with your heat gun. This will make it tacky. Now sprinkle it with Dazzling Diamonds (or fine glitter), tap off excess and heat with heat gun again to set. (You can also use a Zig Glue Pen and sprinkle the glitter over and tap off excess ~ heat and stick just gives it a lovely even coverage)
-
Using glue, stick the baby to the cloud using the partial image of the baby to guide you. Then mount the baby image with foam tape on the Star stamped Background.
-
Place a row of three Clear Rhinestones down the top right hand side of the card.
-
You have finished!!
THANK YOU, CAROLINE!
Email your questions to info@craftfactory.com.au
For our full range of stamps click here!